
This page discusses some of the steps and processes used to construct the Children's Play Table. Some aspects of the process contain a lot of detail while others have been entirely omitted for brevity. While certainly not a tutorial by any means, the attempt here is to give an idea of what goes into the making of a custom piece of furniture. It's my hope that you enjoy learning about the process and it helps to lend a greater understanding and appreciation for the art of custom woodworking.
 The first step of the actual construction is the selection of the rough-cut lumber. This involves one, or more trips to mills and/or lumber yards. Choosing the proper lumber at this stage has a far greater impact on the project than one may initially expect.
The appearance of any wood is a product of many factors to which it was subjected over the duration of the tree's life. Factors such as the type of soil, the temperature range, and the variability of rainfall can all have dramatic effects upon the color and grain patterns in the resulting wood. And yet, there are still other determinants such as where the tree grew. Was it located deep within a forest or closer to the edge? Did it grow on level ground without any other trees leaning against it or did it live struggling to grow straight on the side of a hill?
Aside from these growing conditions, we must also consider the number of different species of the same general type of wood. While we frequently speak of woods like Oak and Cherry, there are over 58 different types of oak trees that can be found in North America alone. There are six different types of Cherry trees found throughout the world.
For example, I have seen several different types of oak in a big box store that were all labeled as 'red oak'. For projects requiring more than one piece, this can lead to real issues in the final appearance of a project. Many of the problems that come from mixing species are only 'apparent' after a stain or finish has been applied. Worse yet, others appear only after the wood ages and/or is exposed to sunlight for several years. All these factors must be considered when seeking quality wood for any project. No one wants to pay for a beautiful piece of furniture only to find it filled with different looking pieces of wood scattered sporadically throughout.
Many of these problems can be mitigated by developing good working relationships with a variety of lumber yards and mills throughout the area. Others can be avoided through experience. Even with all this, at the end of the day, it ultimately comes down to spending the time and effort to go through large piles of lumber piece by piece hand selecting each piece for its suitability for a particular project. Further yet, for some projects, acquiring all the needed lumber from a single tree is an absolute must. There just aren't any shortcuts to this process.
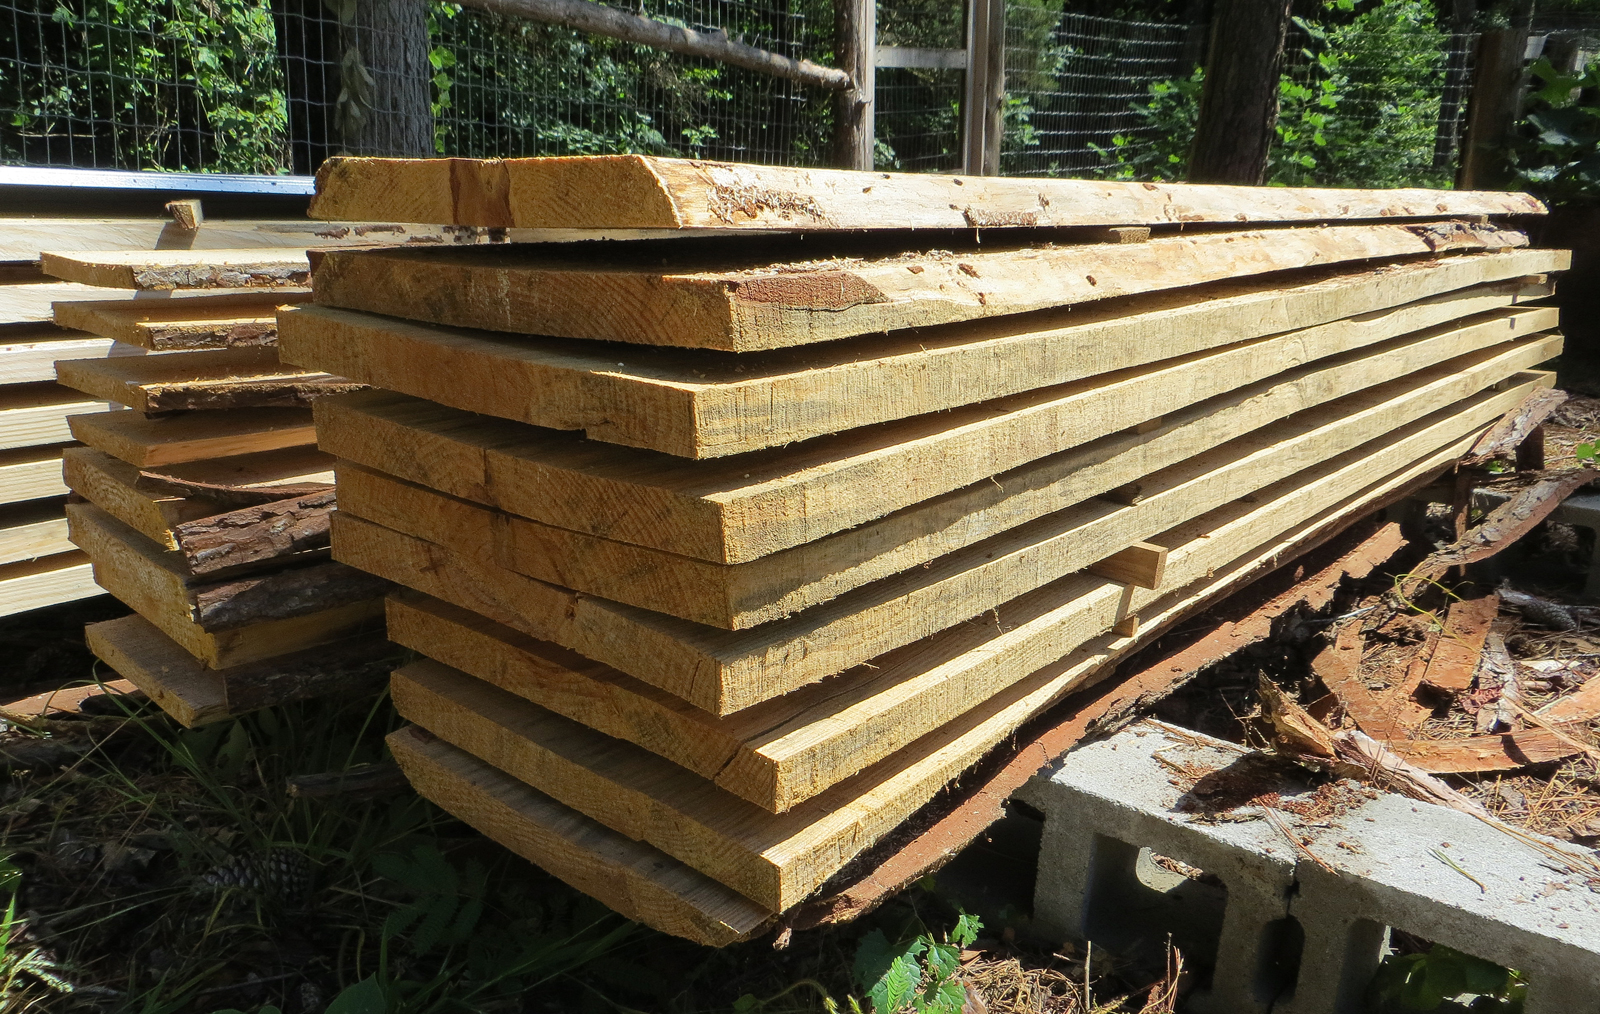
 The picture to the left is the Jatoba lumber used for the play table. This is an example of rough cut lumber that has been hit-skipped planed at the mill, which explains why there are alternating rough and smooth spots. This is done to help buyers better see the grain pattern in the lumber.
This may seem like a lot of lumber considering the size of the table and chairs it was used to make. Herein lies some of the costs associated with these projects.
First, good lumber is typically quite pricey, to begin with. It is sold in units of 'board feet'. One board foot is a piece of wood that measures 12" X 12" X 1" thick. Rough cut lumber is sold by the piece and price is calculated by the number of board feet within it. Typically, every piece contains unusable areas such as split ends, inconveniently located knots, inconsistent widths, etc. This all leads to much less than 100% utilization of the quantity purchased. For very high-end pieces, where the selection of very specific grain patterns is required, the utilization may be as low as 25%!
As mentioned above, it's also necessary to buy enough lumber the first time to account for test pieces, prototypes and, yes, errors too. Otherwise, there's no guarantee 'perfectly' matching lumber can be obtained upon a return visit to the lumber yard.
After acquiring the needed wood for the project, the milling process begins. Milling consists of surface planing the lumber to a consistent thickness by removing the 'rough' material from both faces of each board. This process usually removes about a quarter of an inch overall from the thickness of the board. This process, in itself, accounts for an initial loss of 25% of the purchased lumber; assuming one-inch-thick stock. Next, the edges must be smoothed and made parallel with each to form a perfectly square board using a process called jointing.
Once all the lumber has been milled, it's time to map the 'cutlist' onto the lumber. This is a critical process where the grain and other features of the wood must be carefully considered to produce an aesthetically pleasing outcome. Beyond the aesthetics, careful consideration must also be given during this process to ensure the long-term structural stability of the furniture.
It's now time to begin cutting each required piece to its 'rough' size. This process is much different than forming metal pieces in a machine shop, for example. When working with metalworking equipment, forming pieces to tolerances of one thousand's of an inch is quite common. With wood, power tools are often used to create pieces that are the approximate size and shape with the final shaping occurring by hand. This is where much of the hand craftsmanship occurs.
Below are some of the many steps taken in the construction of the play table.
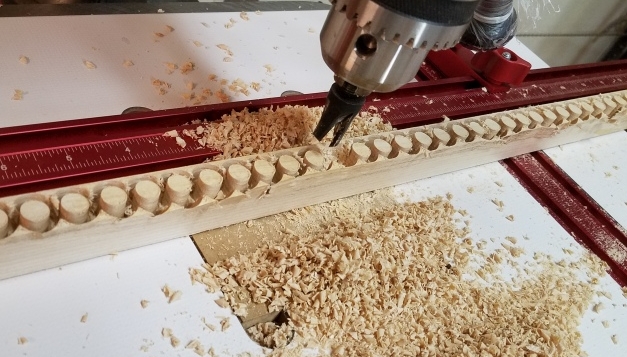
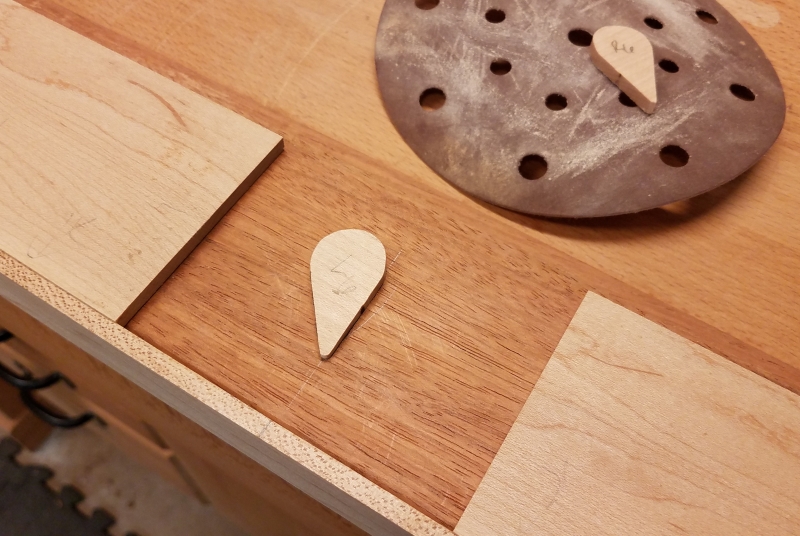
The first step in creating the circular accents for the table and chairs involves cutting plugs that are slightly conical from a piece of straight-grained sugar maple that has the correct color for the project.
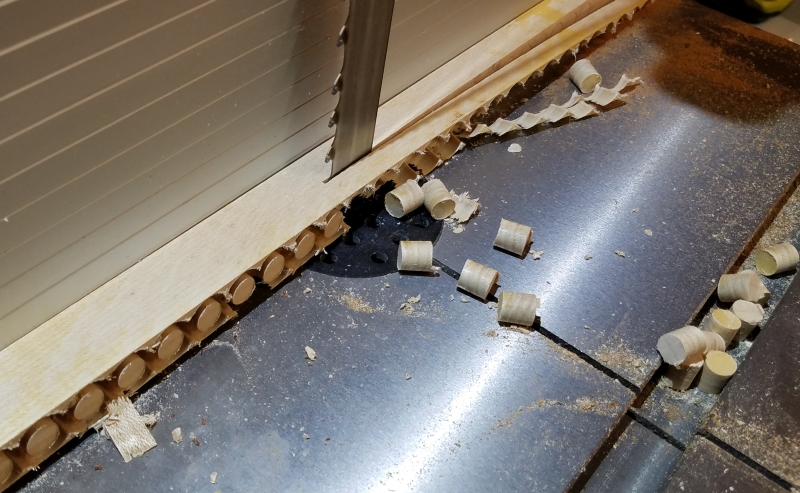
Once the plugs are created, they are liberated from the stock on the bandsaw.
Next, holes are drilled into the receiving pieces using a highly precise edge cutting drill bit.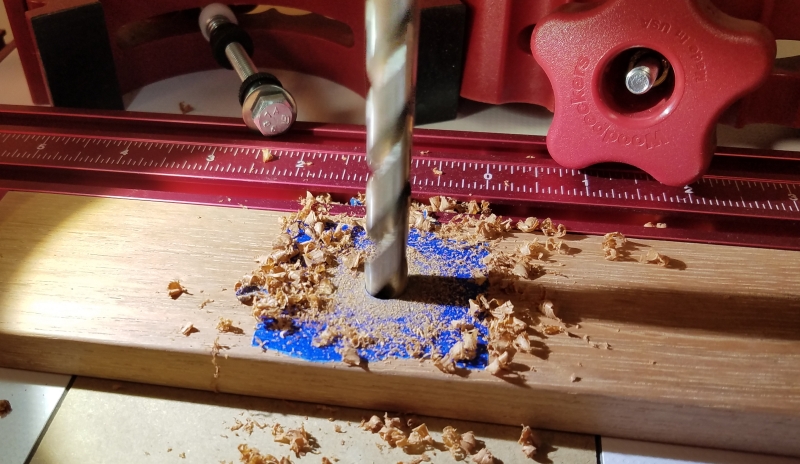
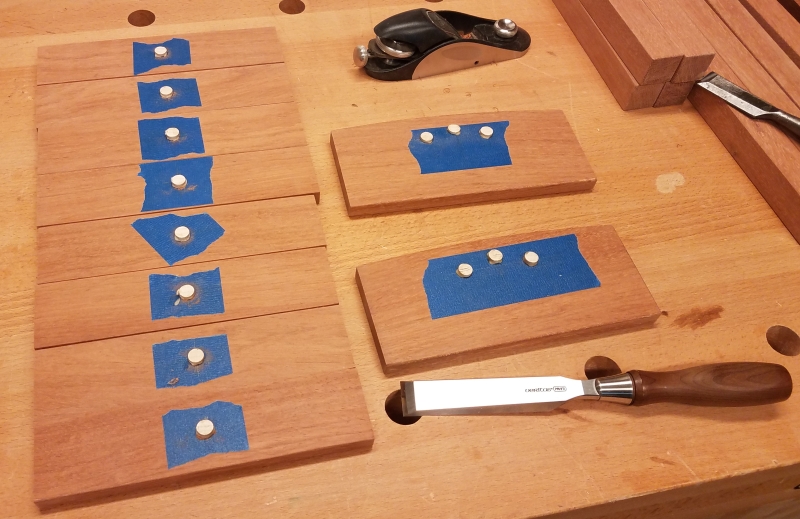 Each plug is then glued and pounded into its mating piece. The blue tape serves two purposes. First, it provides a good surface to draw locating lines and also protects surrounding areas from glue squeeze-out.
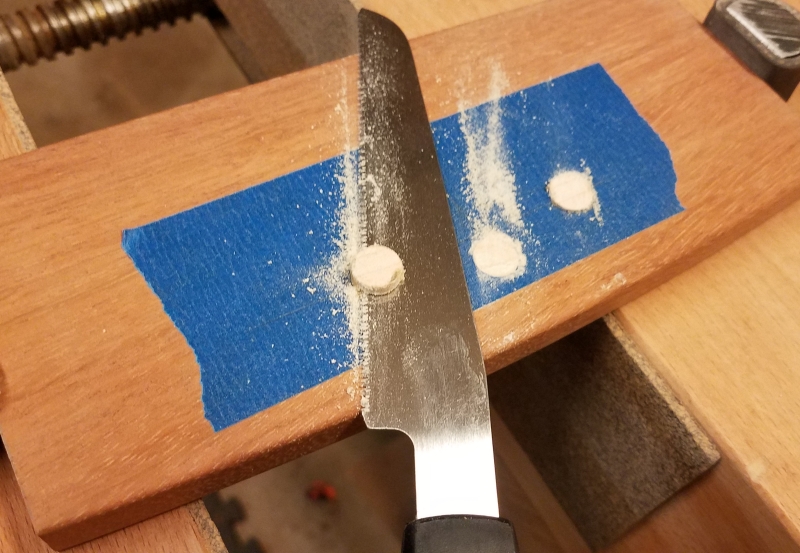 Once the glue has dried, each plug is cut with a special handsaw designed especially for this purpose. The tape also helps protect the surface of the wood from scratches from the saw.
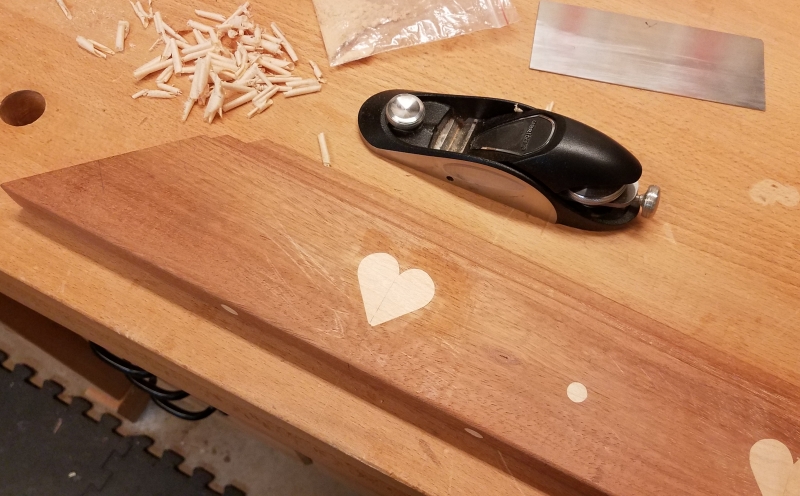
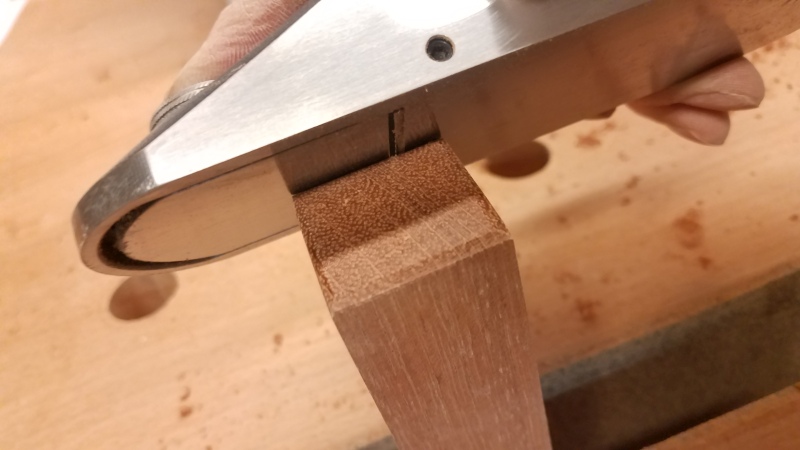
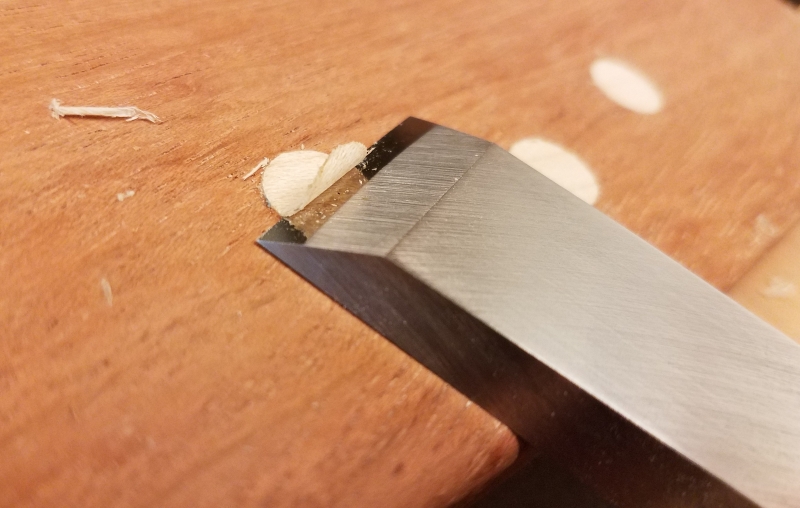 Finally, the tape is removed and each plug is trimmed flush to the surface using a high-quality hand chisel.
As shown in the photograph, the chisel cuts across the grain of the hard maple plug like a hot knife through butter. The tool cuts with this ease for two main reasons. First, it's made from specialized powdered metallurgy that is incredibly hard. Secondly, these chisels have been sharpened to a razor's edge- as sharp, and dangerous, as a scalpel.
Here we find an extremely important detail that is hidden well behind the scenes. Keeping these tools constantly sharp requires constant sharpening, especially after working with such extremely-hard woods. Just as using hand tools requires skill that only takes residence in the hands after many years of repetition, the sharpening process presents its own learning curve and requires yet additional specialized equipment.
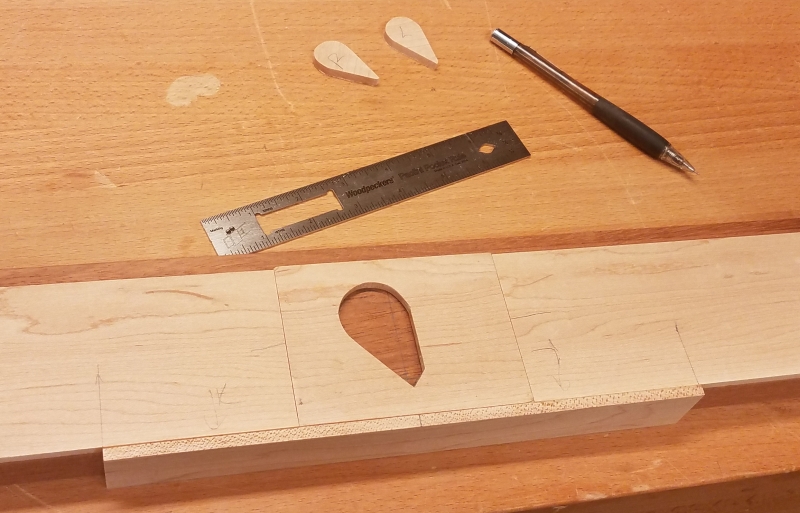 The process of inlaying the hearts was a bit more complicated and time-consuming. Essentially, a negative pocket had to be removed from the Jatoba and a correspondingly sized positive piece had to be cut from the maple. Both processes required the creation of a template to guide the router during both cutting processes. The template began as a CAD drawing that was transferred to a piece of maple. A simple jig was also required to precisely hold the template in place. Templates like this can be created in many ways although the usual process involves creating a special file that is uploaded to a precision laser cutter that subsequently cuts the template from a sheet of clear acrylic.
You may be wondering why the heart template looks more like an ear than a heart!
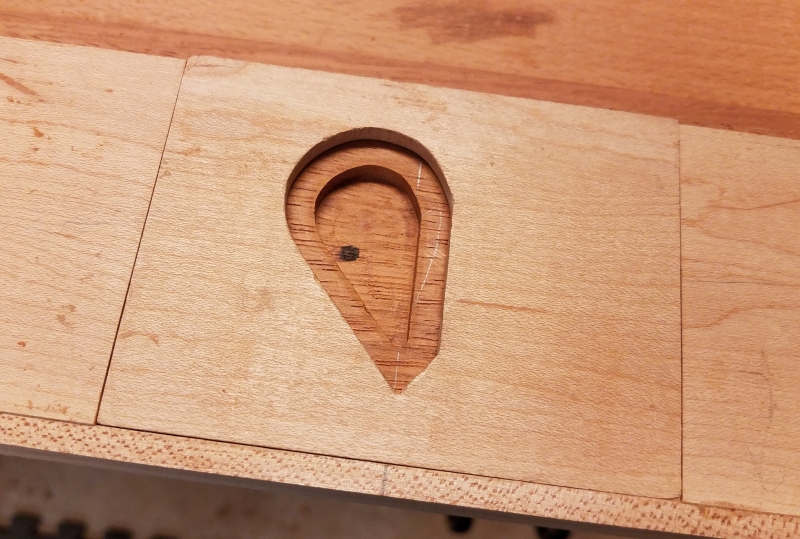 This is because the rotary tool that follows the template to cut both the pocket and insert is 3/8" in diameter. Because of its size, it cannot cut the sharp angles found at the top and bottom of a heart shape.
Due to this limitation, these sharp angles had to be serially cut against each other during two separate cutting operations. The photo on the left shows the first half of the pocket cut into the jatoba.
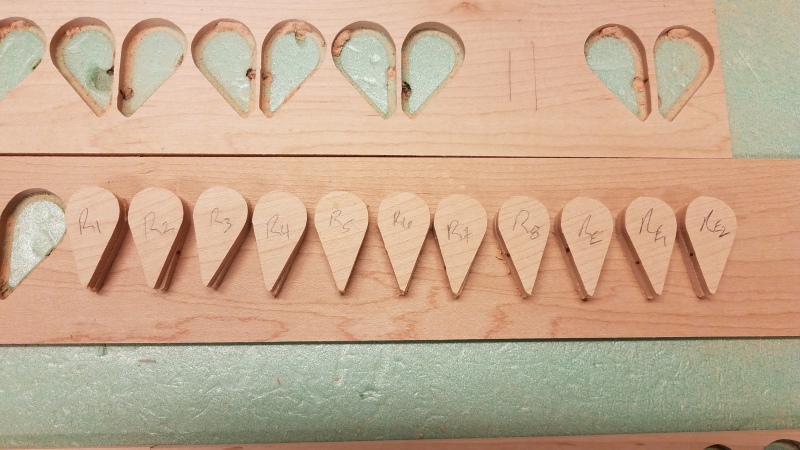 The photo on the left shows the maple heart inlay halves that have been cut from clear-grained 1/4" maple.
The maple stock has been affixed to a foam backer board with double-sided tape to prevent the pieces from being caught and damaged by the cutter once they are completely cut from the stock. Each piece is labeled so they may be paired up in the inlay to preserve the grain pattern within each heart.
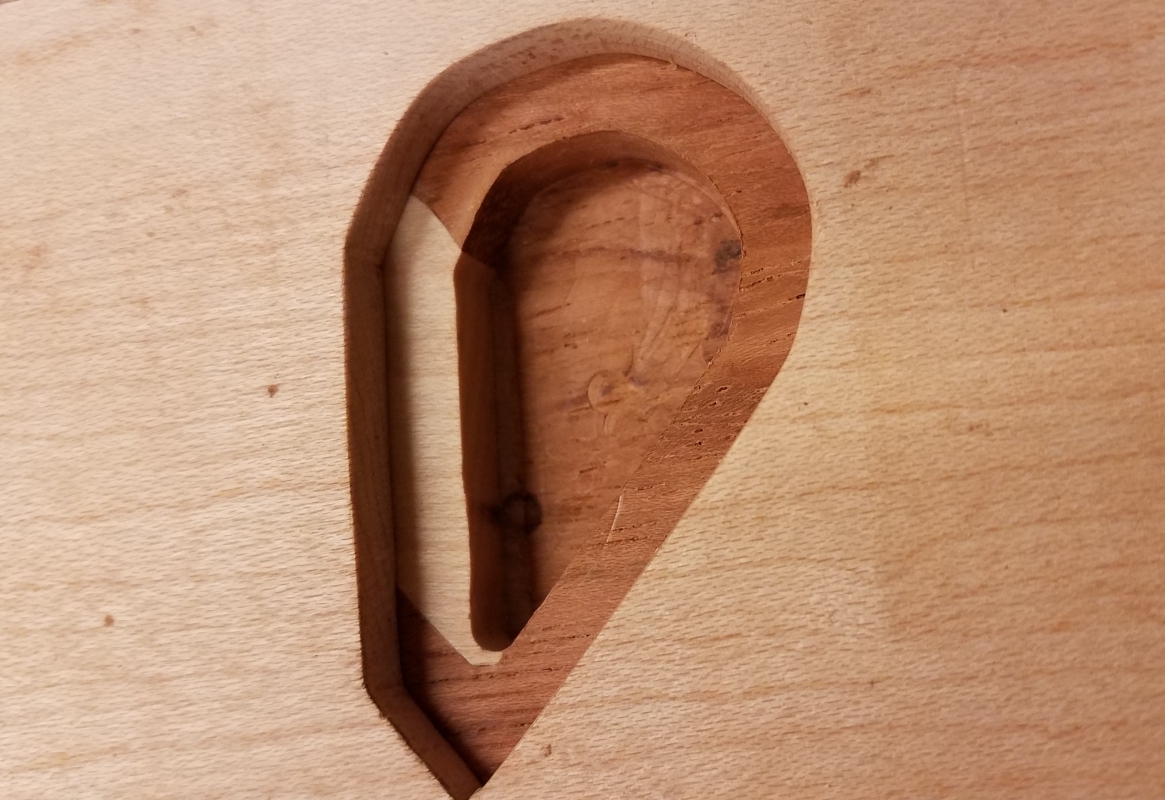
 Here the first half of the heart has been glued into place after small adjustments to its size and shape have been made by careful hand sanding.
As shown, the inlay is slightly thicker than its corresponding pocket. This allows the piece to be paired down by hand until it is just flush with the jatoba's surface.
 Once the first half of the maple inlay has been paired flush the template is reversed and the second half is cut. Note that this second cut traverses into the first maple inlay, thus creating the sharp angles required at the top and bottom of the heart.
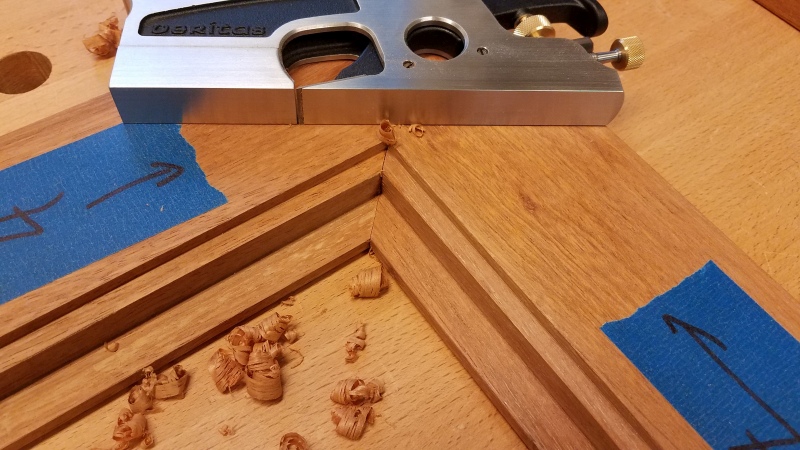
 Next, the second inlay is hand-fit, glued into place and paired flush with a hand plane.
The hand plane, like the chisel, is razor-sharp and is capable of removing extremely fine shavings. Any maple left proud of the surface was subsequently removed with a hand scraper, also shown in the photo.
Despite the order implied here, the inlay work was the last step before assembling the pieces of the tabletop. Because so much work had gone into shaping the four tabletop pieces, there was some anxiety over making a mistake at this point. Just one slip while inlaying any one of the 34 inlay pieces would require remaking the damaged piece and redoing the fitting process. Fortunately, everything went well as planned. However, mistakes during these processes are not as rare as one always hopes;)
 As work progressed, the recesses cut into the tabletop to accommodate the plastic bins were individually brought to their final depth and made to match their mating pieces by hand using a special plane known as a shoulder plane.
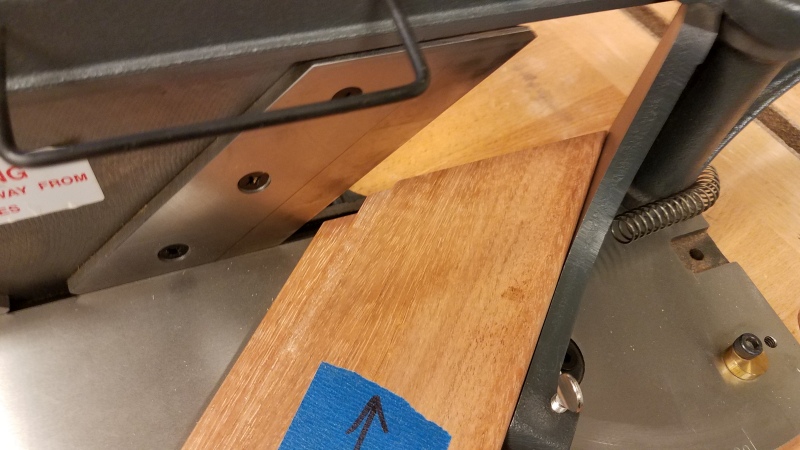 The actual angle of the 45-degree corners were adjusted using a device known as a miter trimmer. It's essentially a horizontal guillotine with a razor-sharp blade that is capable of producing shavings as thin as 1/100". This is often necessary to get perfectly fitting joints because it is impossible to cut perfect 45-degree angles- or any other for that matter. Instead, one-piece may be cut at 44.85 degrees while its mate may be at 46.4 degrees. As mentioned earlier, wood simply cannot be cut to absolutely precise tolerances. It must always be carefully trimmed and shaved to achieve perfection. Fret not, for therein lies both the challenge and the true joy of fine woodworking!
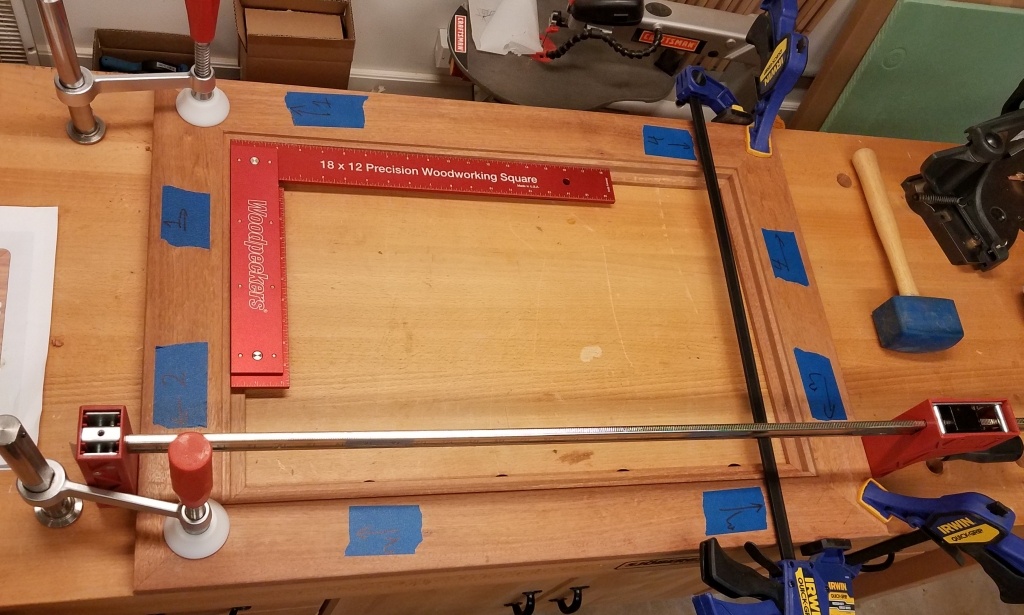
The tabletop was test fit together prior to placing the inlays into it. All angles had to be refined through a process of successive trimmings and reassembly until all four pieces fit together flawlessly. This required many iterations over several hours of fine-tuning.
It is often these small details, and the time that is taken to achieve them, that differentiates finely made furniture from their less-fine cousins.
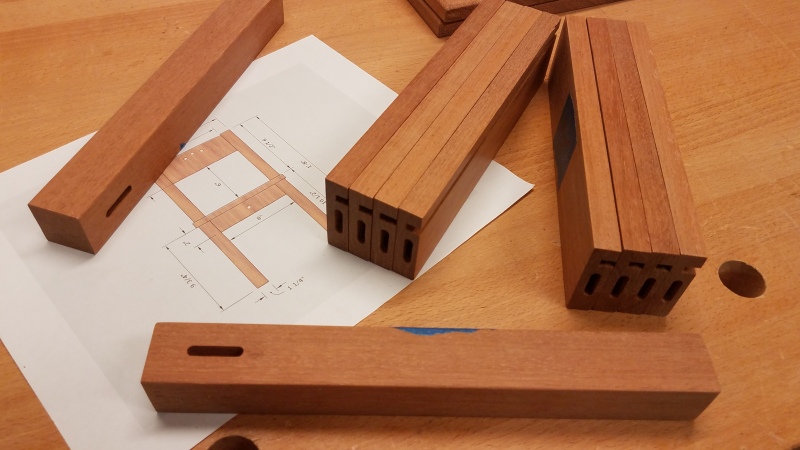
The four pieces comprising the table's top were then joined together using mortise and tenon joinery.
One small detail that plays a large role in the look and feel of a finely made piece of furniture is the time and care taken to smooth the sharp edges. This is especially important in areas where the hand is likely to contact the piece.
It is often within these small details that the presence of the craftsmen is revealed.
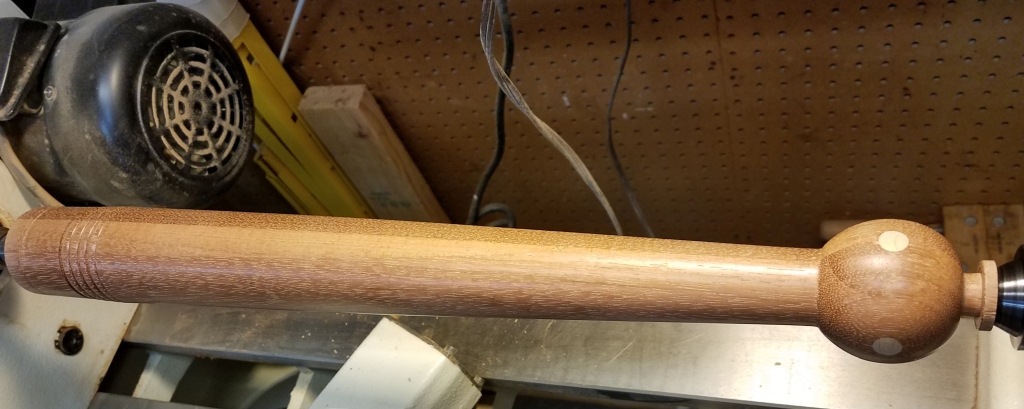 The table's four legs were hand-turned on a wood lathe.
Again, the process is much easier when using extremely sharp tools. While the lathe tools are not as sharp as chisels and plane blades they are still capable of cutting wood so efficiently they produce a glass-like finish.
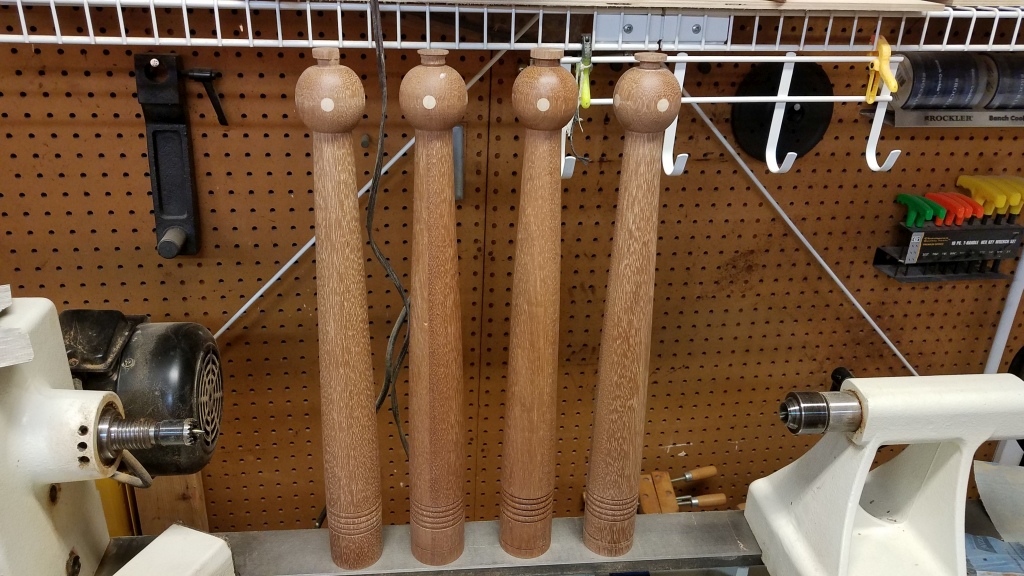
As always, making the first of anything on a lathe can be difficult, especially with an ultra hard wood like Jatoba. It is, however, far more difficult to then make three more exactly like the first!
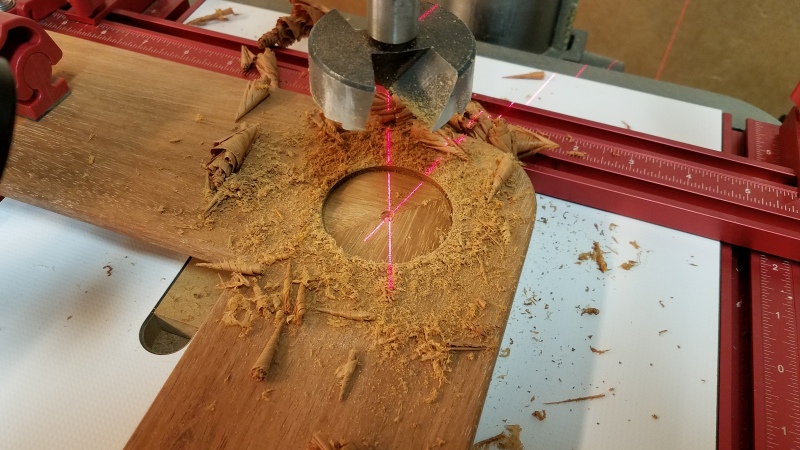
Next, the large diameter holes for each table leg was drilled to a precise depth.
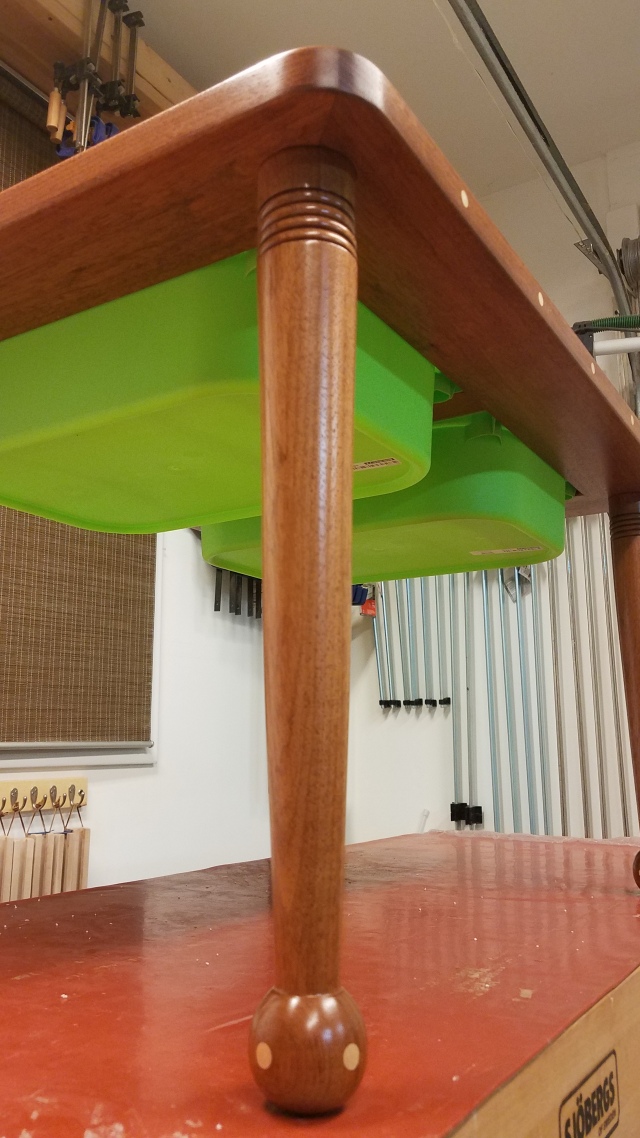
The legs were inset into the bottom of the table to improve the look of the junction and to strengthen it.
With all the parts for the chairs created, it's time to begin test assembling each chair.
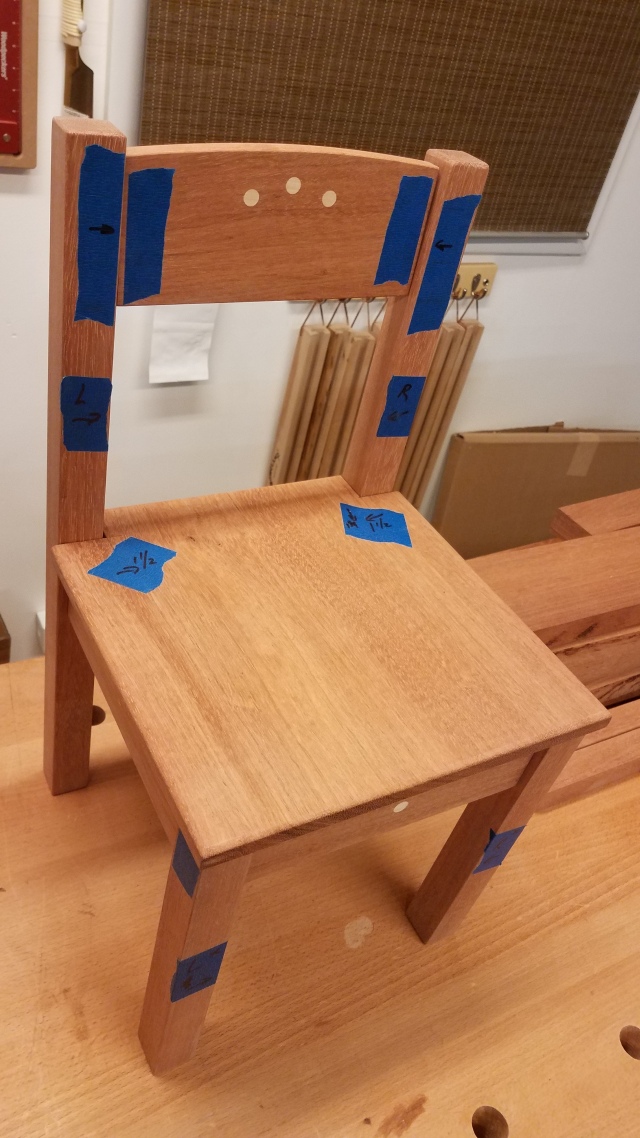
Each chair is 'dry-fit' together to ensure that everything fits appropriately prior to gluing and final assembly.
The chairs, like the table, are held together using mortise and tenon joinery. The mortise and tenon style joints are extremely strong which helps explain why it has been used throughout the World for over seven thousand years!
As an aside, most fine furniture is assembled and held together without the use of any metal fasteners. With proper design and construction, strength comes from the wood itself and glue is all that is required to hold the parts together. Furniture made this way will stand beautifully for generations of heavy use!
The attachment of the chair's seat, below, is one exception to this practice.
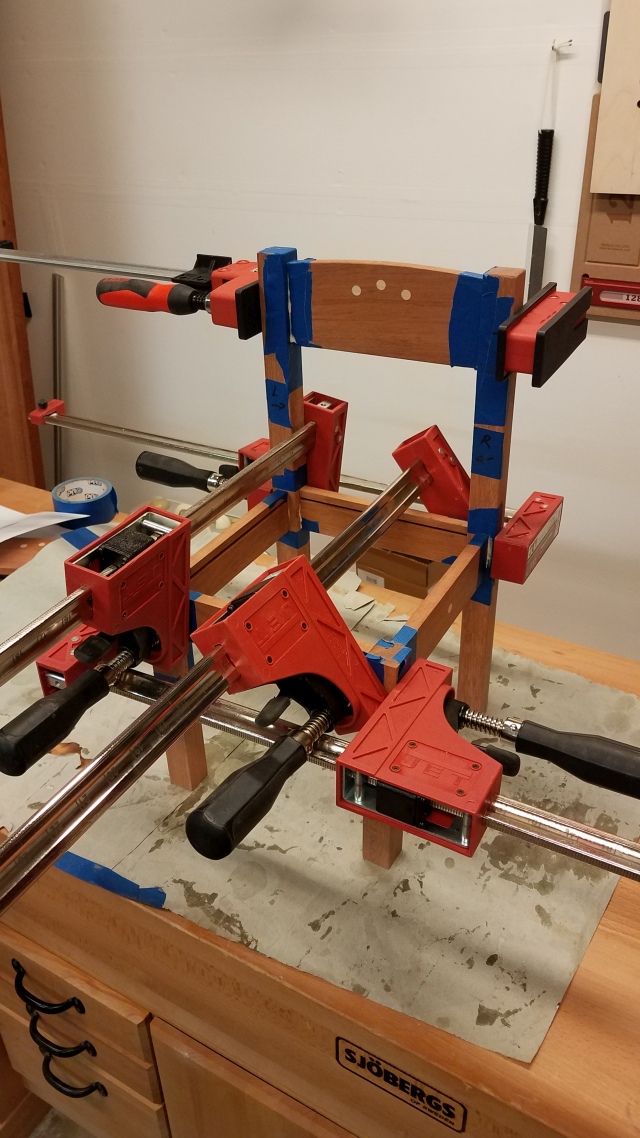 Once all the parts are worked until they fit tightly together, it's time for the final gluing and assembly.
As shown, a furniture maker cannot ever have too many clamps.
The blue tape here, as elsewhere in the project, serves multiple and vital purposes. First, because each piece is hand-fitted with its mating piece(s), the pieces are not interchangeable. As such, each piece must be marked and its mating piece(s) identified.
The second purpose is to keep excess glue, that squeezes out from sticking to the wood, which would prevent the proper adhesion of finishes applied after assembly.
 Attaching the seat is the last step to assemble the chairs. What may seem to be a straightforward operation is actually one of the most important steps in the design and assembly process.
To do this properly, so that the chair doesn't pop apart or begin warping or distorting, we must consider the nature of the wood itself.
Long before the tree was felled and we decided to make a nice chair from it, this wood had two important tasks within the life of the tree.
One, it provided the strength and structure that allowed the tree to stand tall and effectively compete for sunlight. The second was its ability to absorb and carry water and nutrients from the ground to the tree's leaves high up in the forest's canopy.
We exploit the first capacity of the wood when we make furniture and other structures from it. It's the wood's latent ability to absorb and carry moisture, however, that is the single most important factor in most designs. The method used to attach the seat of this chair is a perfect example of how this concern influences its design and construction.
Most wood used to build furniture has been dried to an internal moisture content of around 6%. However, as the wood absorbs moisture it will change the dimension perpendicular to the grain. This will literally cause the seat to widen in the summer when the relative humidity is high and shrink in the winter when the humidity is low. How much it will change depends upon several factors, the most salient being the type of wood. With Jatoba, the chair's seat can repetitively grow and shrink by as much as 1/8". Should the seat be mechanically connected to the frame of the chair in a way that doesn't allow for these changes, the movement would either break the chair apart or cause the seat to warp. This is true for all solid wood panels and is amplified in large applications like tabletops. Consider, if a chair seat 12" in width will change by 1/8" then a three-foot-wide tabletop would change by 3/8".
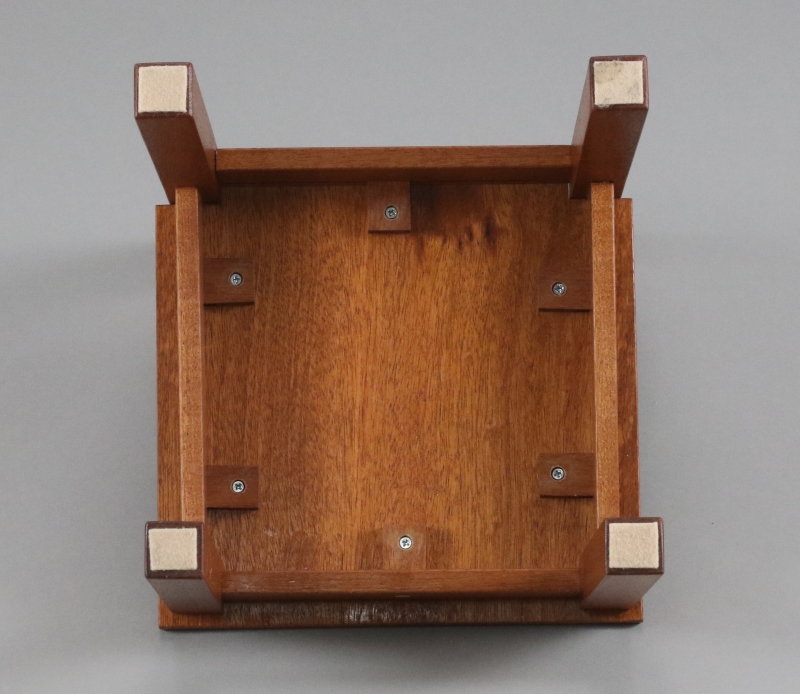
Thus, the chair's seat must be connected to the frame in a way that both holds it tight while still allowing for its seasonal movement. This is accomplished by using wooden clips screwed to the seat but attached to the chair's frame by gripping slots cut for this purpose; as shown in the photo on the left. This allows the clips to slide along the groove as the seat expands and contracts while still holding the seat tight to the frame.